
Back in the very very beginning of my time of writing posts here, I made vanilla extract. It was a wonderful experience. No, I’m not weird for thinking that. The reason it was so wonderful was because it was SO easy. I love replacing things that I buy at the store with homemade versions, but even more than that, I love it when they are EASY projects. I do have to warn you that you will probably never buy it again if you make it. That’s probably exciting for some of you, but there are others of you who will be doubtful of it. If you were a vanilla snob already and are used to forking over $19 for the big Nielsen-Massey vanilla bottle (although my mom has given some to me in the past that she found cheap somewhere…thanks, mom). If that is you, this will definitely save you some big bucks. If you typically buy the grocery store brand of vanilla that is “imitation” and usually doesn’t contain alcohol, this will not save you money. You should still make it, though, since that imitation stuff is pretty yucky.
The only ingredients are:
Vanilla Beans (2 for every 1/4 c. vodka) & vodka
I followed this site again in their recommended ratio of beans to vodka.
 
I got these perfect size little bottles at The Container Store last year and they would be perfect if you can find them. I went this year (during the annual awesome wrapping paper extravaganza) and they didn’t have any. UGH!! I search all over online and nobody ships this size. The will ship one that is 10X as big, but not this teeny tiny one. So weird. This year I decided to try the cheaper beans from Trader Joe’s which are $4 for 2. Trust me, that’s a deal compared to $14 from McCormick’s at the grocery store or $8.50 for the Nielsen-Massey.
 
Before you start, sterilize the jars in boiling water for 8 minutes. Erica is doing an awesome job showcasing this :).
1. First scrape the beans. If you slice the bean down the middle without going through the bottom layer, you can peel it open and get a good, clean scrape.
 
2. After a the seeds (called caviar…love that!) are removed, cut the beans in about 1 inch pieces. They will not float to the top if they are smaller pieces.

3. Measure your liquid space in the jar by using water first. Once you know how much liquid you need, you will know how many beans to use. For example, I used a cup of vodka in my jars, so I placed 8 beans inside.

4. At first the bottles will just look murky, but as you shake them every day, the fluid will get darker. For the first few days, shake them a few times a day. After that, shake them once a day for 2 weeks. Then, you can shake them only when you think of it.

After 6 months, you can strain the extract. I’ve kept mine in for a year, but I’ve heard the beans go bad after a while. You can also put new beans back in the bottles if you like.
I am aching to make something I tried today at WhiskandLadle. We went to the Scripps La Jolla Aquarium and then over to WhiskandLadle for brunch. To start, I had a piece of butterscotch banana bread with dulce de leche. Yes, it was as good as it sounds and was a perfect comfort food since I wasn’t feeling really great. I really want to make it and this vanilla extract will be perfect in both the banana bread and the dulce de leche.
Now, for some vanilla extract labels…

Craziness! It’s already been a year!
The official time I started my blog was actually back in August of 2010, but I wanted to get things just right on the design end before posting. It’s kind-of a joke when I think of it now because it was FAR from nice and my posts were pretty sad-looking. I knew they were not awesome, but you have to start somewhere, right? I did like my first real banner above, though. I kind-of miss it.
Speaking of design, how do you like my new comfy space? I wanted to go back to my roots with a wood background (my very first wordpress website had a dark wood background) and just step it up a bit. I think it’s pretty cozy. Special thanks to Jay Woolwine for installing the parts I couldn’t and to Erik Weston Homestead for listening to my blubbering about colors, banners, and whether there should be lines separating other lines and other very important details.
1. Be sure to check out the categories to our right which will link you to pages with visual links to all my posts. —————>>>>
It’s SO much easier to use. Yes, it took me a LOOOONG time. If you like it, please let me know. If you don’t like it, keep it to yourself :).
2. <<<<————–I also have a cute new scrabble social bar which you can use to share my page after you read this :).
3. ^^^^Above is my new banner which is hopefully reflecting my handmade style. ^^^^
It’s been a great year for this little space. I started my first month of viewers with just a few of my closest buddies and some obliging family members. Now, I am astonished at grateful at having over 15,000 people visiting in just a single month!! Wow, people! There must be something just a teeny tiny bit likeable goin’ on here.
*blush*
My second year will hopefully bring even better things. A few cool things to come are some useful printables in the name of Valentine’s Day, some embroidery hoop projects and a hoop swap, cool thrifted products remade, some exciting kid’s room redecorating with help from here, a revamped garden with new techniques, things I’ve never canned before are going in those cans, working on a dress for myself, and I’m dragging my friends here to do some of this stuff with me! Sound good?
In honor of this special day, I am sharing a cupcake with you all. Yeah, I kinda thought you would like it too. My sister actually made these back in April for my Miss F’s birthday I just totally forgot to post them. I guess it was meant to be. I saw them on Pinterest and asked my sister to make them and since she’s awesome, she said yes.

Cuties.

I used my neighbor’s freshly cut olive wood firewood for their little perching area.

Thanks for your support and for hanging out with me in this little space.
The community here means a LOT to me.
Thank You, friends!

Yes, I love ocean spray too. In fact, I have always preferred it and have even been known to buy a few extra cans to open when the company leaves. I don’t think any of us can explain it. Who would have ever thought that any food with ridges on it would be appealing? We just like it, right? Our parents served it to us and it became a tradition and comfortable.
Small problem. There is so much corn syrup and high fructose corn syrup jammed into one can now that I can’t even stand it anymore. Last year, I attempted a homemade version that I put in a can to pop out like our favorite. It tasted pretty close, but didn’t “jell” the way I would have liked.
Enter: 2011 version which definitely has that “jell”.

These berries capture the holiday spirit all by themselves.

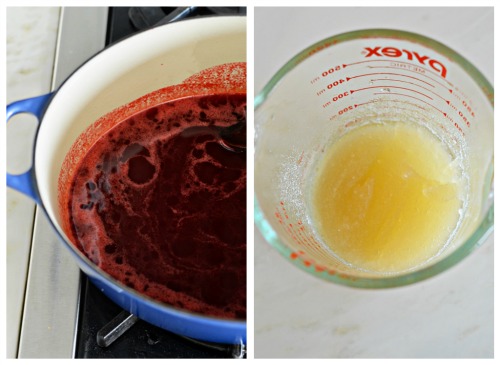
Combine cranberries, sugar, and 3 c. water until the berries start popping. Usually this takes about 20 minutes, but it totally depends on your pan and its heat conduction. After the majority of them are popped, you can strain it in a sieve. I’m not cool yet and don’t own a $100 dollar sieve, but I just strain mine once through a colander and then again through my small sieve. It works. I do hope to join the sieve club soon, though, because it will save me some serious time. You just need to strain it until you have 3 cups of liquid. You might need to use a spatula to move the cranberries back and forth to get them to pass through. While it is straining, combine the 3 Tbsp. water with the gelatin and let it sit for a few minutes. After that, return the liquid to the pan and add the gelatin/water combo. Simmer until the gelatin is dissolved and remove from the heat. Immediately, pour the cranberry sauce into the mold. In my case it was a BPA-free can. That way you don’t have to worry about a weird chemical transfer after all that work. Yes, many cans are actually labeled BPA-free so you should have no problem finding one.

Here they are, ready to throw into the refrigerator for at least 12 hours but at least a day is best.

Can O’ Cranberry Sauce
(adapted from Epicurious)
4 bags (12 oz.) cranberries
2 1/2 cups sugar
3 c. water
3 envelopes of unflavored gelatin + 3 Tbsp. water
If you dare…

Yes, I really did that. What can I say, I love Legos and I love my boys.
You could put this in any mold you want. If I was Martha, I would put it in a cute little turkey mold, but I’m not.
So, I made Lego cranberry sauce.
…
Note: If you wanted to can this, you would just process it for 5 minutes. After you sterilize the jars, add the liquid to the sterilized jars at the same point you put them in the can.

Last year, the canned item I got the greatest response to (besides pickles, of course) was salsa. It seems that salsa speaks to everyone. The cool thing about salsa is you can basically make it however you want. I have a “gringo” tongue so it’s pretty abnormal that I would even stick a jalapeno in it at all…hehe. What? You think I make tomato soup, not salsa, eh? To each his own, I guess.
So, turn some music on before you start this recipe and enjoy…

Start with whatever you feel like throwing in. My sister and I chose local heirloom tomatoes, red peppers from my garden, jalapeno, red onions, garlic, and local apricots.

I roasted the peppers and tomatoes together. In another pan, I roasted the onions and garlic. The tomato group I drizzled with olive oil and broiled for about 10 minutes or until the are charred :). The onion group I drizzled as well, added salt and pepper, and roasted for 45 minutes. I had a lot of onions so you might only need to roast a small batch for 20 minutes. The apricots I did the same as the tomatoes. Again, if you are making a small batch, you could probably fit it all on the same roasting pan.

After the charring and roasting, we blended both until evenly chopped to our desired consistency. For me, I wanted something that wasn’t pureed but not too thick. You know, the kind of salsa where you scoop it and it stays on, chunks aren’t falling off. but it’s not dripping.

My sister in her awesome apron she made from a not quite as awesome men’s shirt.

Chop up the cilantro and toss it in. Salt and pepper the salsa while you’re at it.

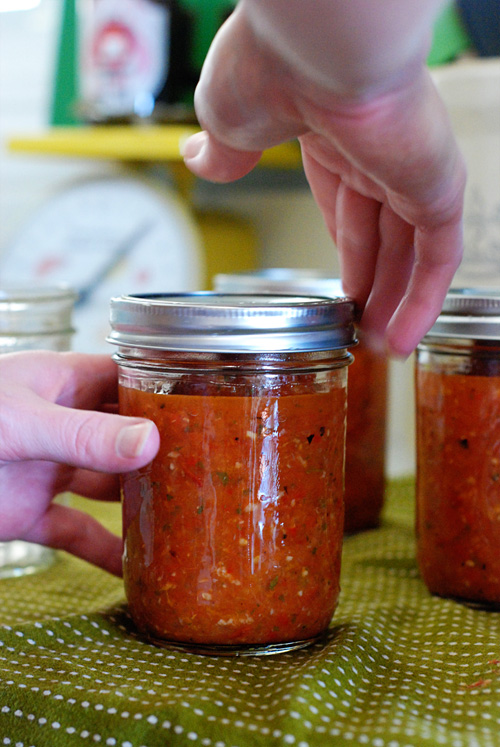
That looks much better now. Cook the salsa until it is simmering, then cook for 10 minutes longer.

Fill the jars with a 1/2 inch head-space and process them for 10 minutes.

You have to work quickly and only fill as many jars as you will be putting in the pot. The average stockpot will fit 6 half-pint and 4 pint size jars.

We were super happy with the results and immediately broke out the chips!
Christmas presents?
Charred Tomato and Apricot Salsa
6 heirloom tomatoes
1 red pepper
1 jalapeno
4 apricots
1 red onion
1 head of garlic (yes, I really love garlic)
1 T cilantro
olive oil, for roasting
salt and pepper, to taste
Share with friends and if there could be a pool or beach that would be perfect.
I am so glad to be done with termites…for now anyway. We have had these crazy creatures in our house bugging us since we first saw their first “kick-outs” right after we moved in to our house 2 1/2 years ago. You see, our house was supposed to be tented before we moved in but while I was giving birth to #3 that wasn’t really taken care of for me by my realtor. Bummer to move in and find that out later but I’m over it now that everything is finished. We had to move out anything that might possibly enter your mouth (I even packed up my play-dough) and all of our plants. If you’ve seen my pantry, you know it was a lot to move. A big thank you to my parents for housing it all in their guest room. Thanks, Mom and Dad :).
This week I was recovering from a Sat/Sun migraine and the kids really wanted to make something so I opted for a surprisingly quick, quick pickle. We had 2 pickling cucumbers and 1 lemon cucumber we picked from our backyard local Red Farm. I knew it was enough for a jar so off we went.

I’ve been staring at this “Asian quick pickle” recipe for a while. I don’t know if any of the Asians make this kind of pickle but I’ve had similarly marinated Japanese cucumbers on my travels to the land of the rising sun.

Mix together all of the ingredients until the sugar is dissolved…minus the pickles, of course :)

Grab your cucumbers. Cut off the ends, peel, and take the seeds out.

^— They will look like this. Put the onions on the bottom of a jar (any jar because it’s not going into boiling water). Then, have the kids stuff the cucumbers in a jar.

Pour the liquid and put in the fridge. Enjoy almost immediately, but i think they were best the next day.

I let the kids snack on the leftover skins and seeds, then took them to my husbands office where he fangoriously devoured them all.
Asian Quick Pickles
(adapted from “Put ‘Em Up!“)
1 c. seasoned rice wine vinegar
2 T. low sodium soy sauce
2 T. sesame oil
2 T. raw sugar
a pinch or red pepper flakes
3 pickling cucumbers
1/2 a red onion or 1 large shallot

Here’s a lovely photo of my man and I whilst engaged, in Japan. I love that country, the people, and the honor that abides there.
|
|


