Christmas Lists…
They excite us and they stress us out. Gift giving has become expected instead of spontaneous. How do we simplify our gift giving at Christmas but still show our love and thoughtfulness to friends and family?
Whether you make your entire gift by hand or purchase it from the store, it’s always nice to have a thoughtful touch to your gift or gift card. Here are some of my favorite ways to bring a personal touch to gifts:
- Live greenery brings the feeling of freshness and relaxation that can be found for FREE from your yard, someone else’s, or purchased from a store.
- Create handmade tags using supplies from home. Old book pages, maps, old postcards, or vintage wrapping paper can be salvaged from your craft closet or even someone else’s!
- Include an item that is either your favorite, their favorite, or just something that recalls a memory or joke between the two of you.
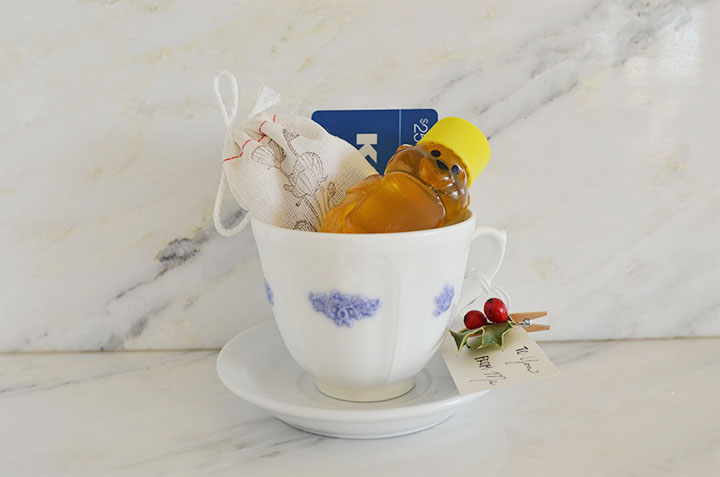
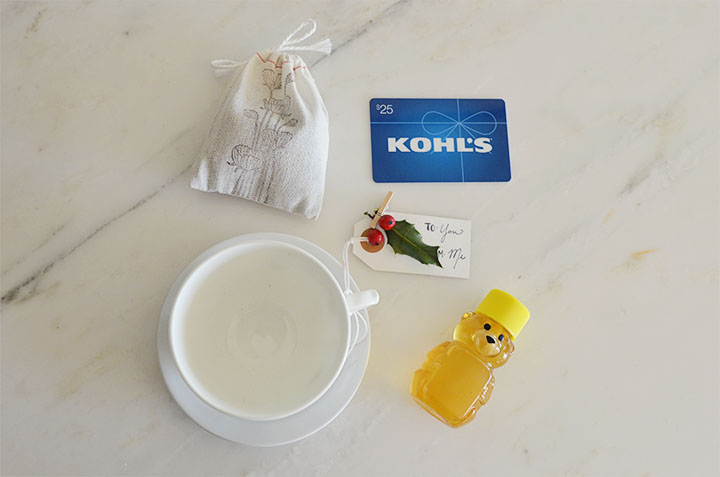
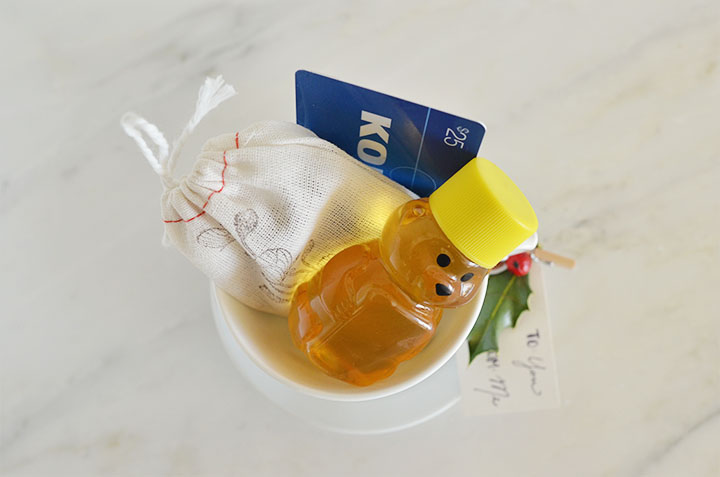
- Gather items that create an experience or tell a story. This tea-cup, tea, local honey, and gift card communicate a relaxing afternoon for a friend, loved one, or just a Mom you know who needs a BREAK! It shows care and attentiveness. Why not throw in some babysitting which will cost you only your time. Perfect for any budget, people! ;)

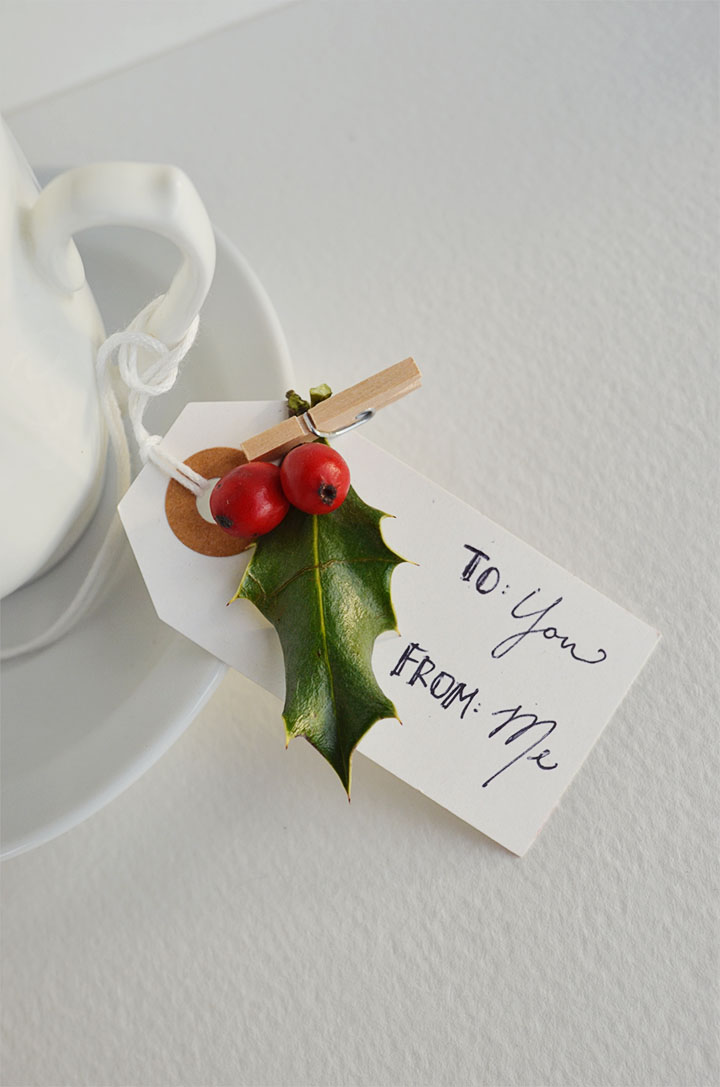
For the tags in this post, I used plain tags found here or use some more fun colored ones from We Love Citrus here. I attached greenery using mini-clothespins from We Love Citrus found here.
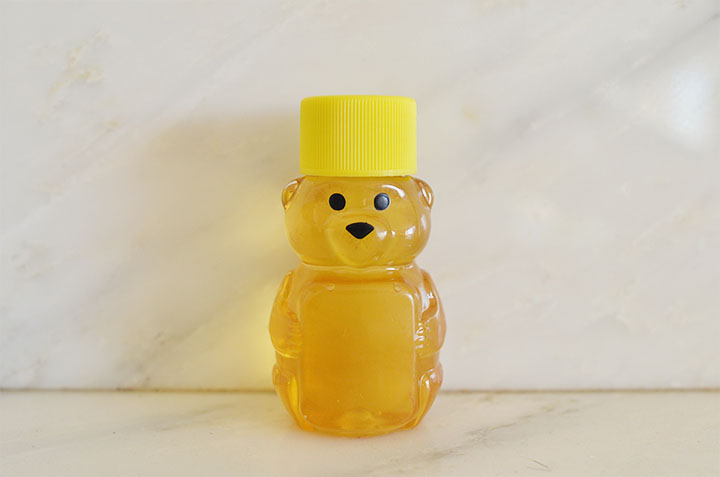
For the honey bears, I added my own favorite local honey from Mikolich into the CUTEST mini honey bear containers you can find here. I can’t even stand how cute they are!
For the tea, I added my favorite local decaf Earl Grey tea into plain cloth bags you can find here. I stamped them with a fabric-safe ink. Cute, right?
For the final and biggest touch, I added a gift card that I got to the tea-cup. Some of my go-tos are iTunes, REI, and Target. All of the small items pictured make that gift card so much for meaningful, don’t you think?!
Click below to follow us on:
F a c e b o o k // T w i t t e r // P i n t e r e s t // I n s t a g r a m // E m a i l
For writing this post, I received compensation. However, the opinions expressed are my own and I was totally thrilled to write it and share my ideas and thoughts on how to make your holiday easier.
 On Instagram today, I posted this picture of us making classic Christmas cinnamon ornaments. Did you make these when you were a kid? I did. I haven’t seen them around since I was a kid. We made them at my childhood home in the 80s, at church groups around the holidays, and we saw them hanging in all of our friend’s homes. This craft is perfect for kids because they can do it ALL. I’m sure you’ve seen the same holiday pins and DIYs for kids that left you thinking…a kid made that or a kid CAN actually put that together? Yeah, I’m confused too. The point of sharing crafts for kids is for the kids to actually be able to complete them with little to no help. On Instagram today, I posted this picture of us making classic Christmas cinnamon ornaments. Did you make these when you were a kid? I did. I haven’t seen them around since I was a kid. We made them at my childhood home in the 80s, at church groups around the holidays, and we saw them hanging in all of our friend’s homes. This craft is perfect for kids because they can do it ALL. I’m sure you’ve seen the same holiday pins and DIYs for kids that left you thinking…a kid made that or a kid CAN actually put that together? Yeah, I’m confused too. The point of sharing crafts for kids is for the kids to actually be able to complete them with little to no help.
This is that craft, people!
So, I’ll share the recipe I use.
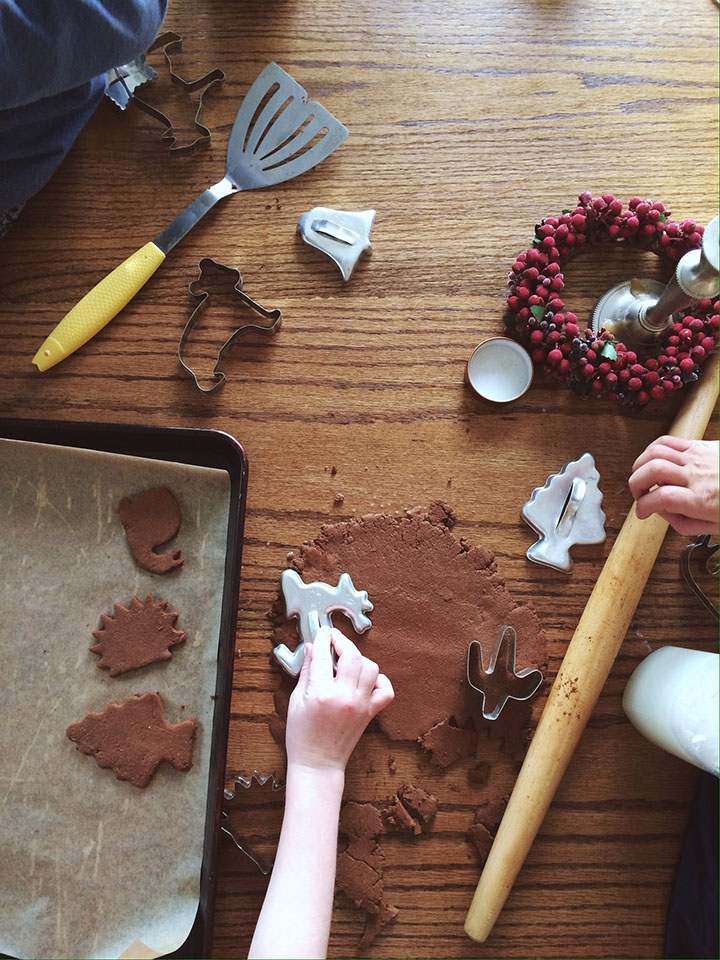
Cinnamon Spiced Dough Ornaments
1 1/4 cups cinnamon
1 Tablespoon ground ginger (optional)
1 Tablespoon ground nutmeg (optional)
3/4 cup applesauce
1/4 cup craft glue (I use Mod Podge)
a straw
an assortment of ribbons for hanging
Preheat the oven to 200 degrees (F). Mix all ingredients together. Roll out the dough between 2 sheets of parchment paper until it is 1/3 of an inch thick. If you make them any thinner, the ornaments will break more easily. If you make them thicker, they will take longer to cook and may not harden properly…then again I haven’t tried to make them 1/2 an inch thick so maybe it’s fine. ;) If the dough is too wet, let it sit for a few minutes and the glue will slowly harden, making the dough easier to work with. Cut your desired shapes with cookies cutters or freehand and transfer the shapes to a cookie tray lined with parchment. If the dough gets dry, just spritz it with a little water. Take a straw and make a hole a small distance from the top of the shape (close enough to tie a ribbon and far enough away that the hole won’t come apart). Cook for and hour and a half on each side, cool, then tie a ribbon through the hole. I would not recommend air drying these because part of the point is for you to benefit from the smell of cinnamon exploding throughout your house. If you don’t bake the ornaments, that spicy waft will not happen. At that point, I would question why one would make them at all. ;)
The ornaments will keep for a few years, but they will start to lose their scent a the spices get old. Also, the ornaments will eventually crumble unless you add some sort of coating. The coating will cover the smell completely, but will preserve the memory/hand-print/drawing/sculpture/design of your kiddo. So, maybe around year 3 you could add a clear coating to preserve the memory.
Click below to follow us on:
F a c e b o o k // T w i t t e r // P i n t e r e s t // I n s t a g r a m // E m a i l
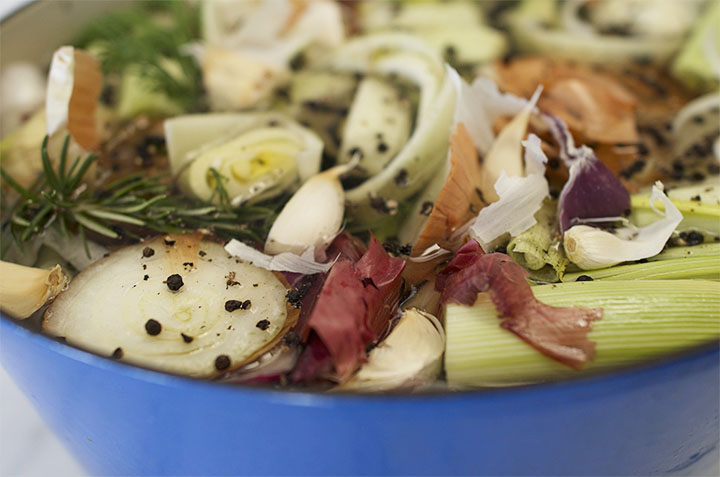
I posted a picture on Instagram this week about some stock I was making and apparently there was quite a bit of interest in what I put in it. Like most of my food posts, there’s usually a story…
Homemade stock and I do NOT go way back. Gasps here wouldn’t be inappropriate. I had made plenty of stocks, yes, but when I was looking to make a soup at home, I had often purchased store-bought organic chicken or vegetable stock because it kept on the shelf and I could just grab and go. No biggie, right?
WRONG!
It was my sister’s boyfriend, Erik, who first inspired me to never buy stock again. Basically, Erik would ask to take home the carcasses from our turkey, chicken, or goose dinner (last years Christmas dinner!) so he could make stock. It had never really occurred to me to make stock on a regular basis, but seeing his habit and process made my see the possibilities. Now, time has past and he has made me wiser. My freezer currently has 10 quarts of stock. I make and use it pretty much every week with our leftover chicken bones, the ends of my onions I don’t need, herbs from the garden and anything else I have in my fridge that I can throw in the pot! Stock has become my favorite things to make because it is so easy to throw together, it leaves an amazingly awesome scent in my kitchen, and I can drink it on it’s own. Call me weird, but try drinking it yourself and we’ll see if you feel the same way.
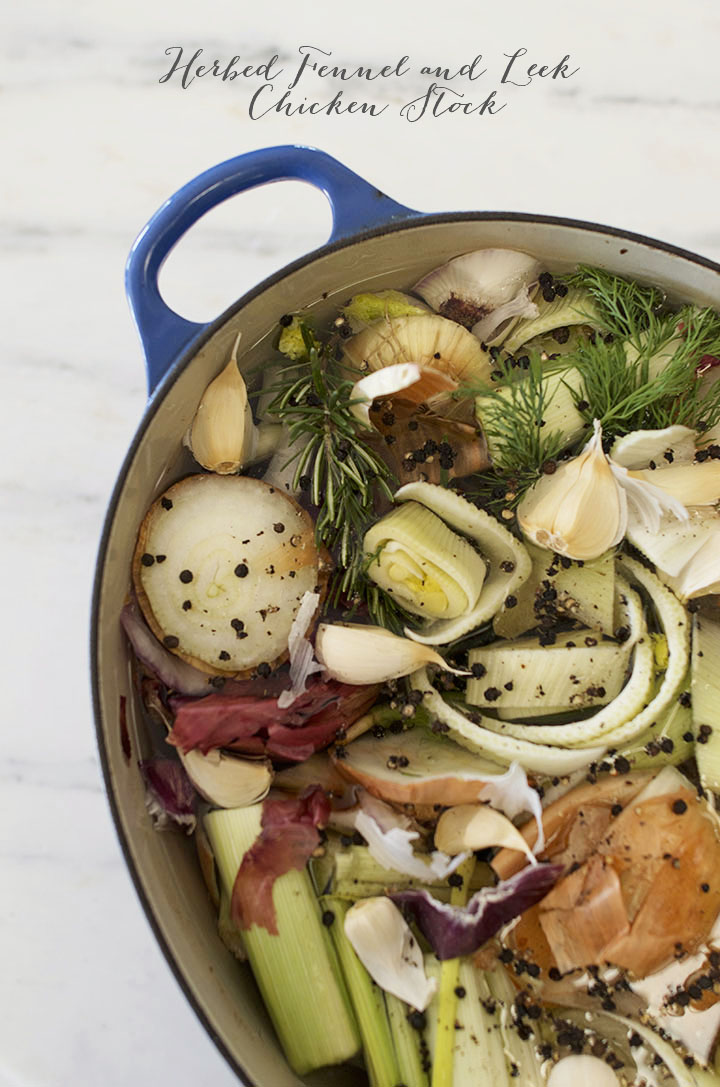
If you like, remove the chicken bones for a straight up veggie stock. The measurements below are only for those who need them. The beauty of stock is that you can really use whatever you want. As long as you have onion, garlic, salt & pepper, and some sort of herb, you can’t go wrong. The addition of leeks and fennel are just related to what the soup will become. This stock could be the base of a soup or gravy and therefore need to be at the top of its game. Try the stuff from the store and tell me if it doesn’t taste like the distant relative of water. Blech. I learned my lesson. Homemade stock is the only way for me. I’m just doing you a favor and converting you now so you don’t lose any time like I did!
Herbed Fennel and Leek Chicken Stock:
1 whole chicken carcass (sorry, there just isn’t really a better word!)
2 leeks, end and green tops removed and slice down the middle
1 large fennel bulb or 2 small
the ends and skins of several onions, maybe 5
1 head of garlic, broken into cloves
2 teaspoons whole black peppercorns
1/4 cup of salt
3 sprigs of rosemary
2 sprigs of dill
2 sprigs of thyme
7 quarts of water or enough to fill up a 8 quart stock pot after all the ingredients are added
Add all ingredients to a pot, bring to a boil, then turn down and simmer for at least 1 hour. Although, I prefer at least an hour and a half so I can get the richest stock possible. Strain and you’re ready to go!
Click the links below to get updates from us!
F a c e b o o k // T w i t t e r // P i n t e r e s t // I n s t a g r a m // E m a i l
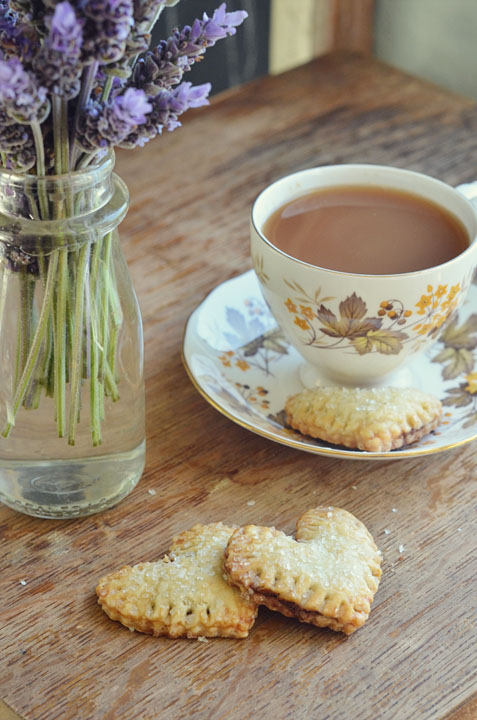
We love Nutella.
We love hearts.
We love pop-tarts.
Now, they have been brought together as one. It’s a good day.
I’ve made Nutella pop-tarts before here, but the heart really gives it that sweet touch (sweet tasting and also sweet looking…har har).
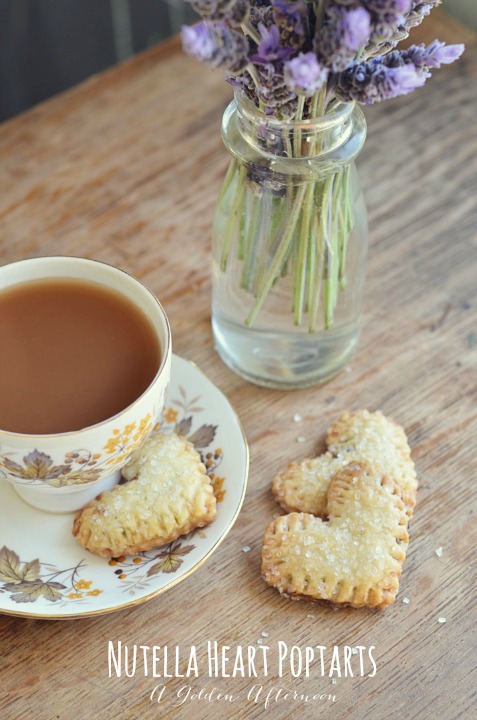
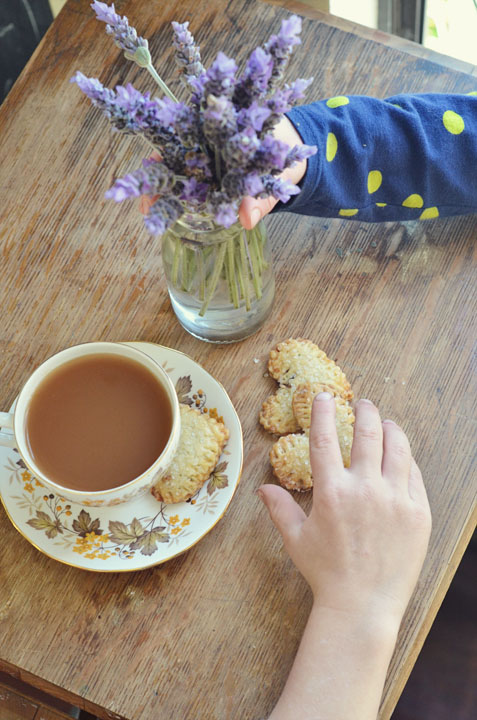
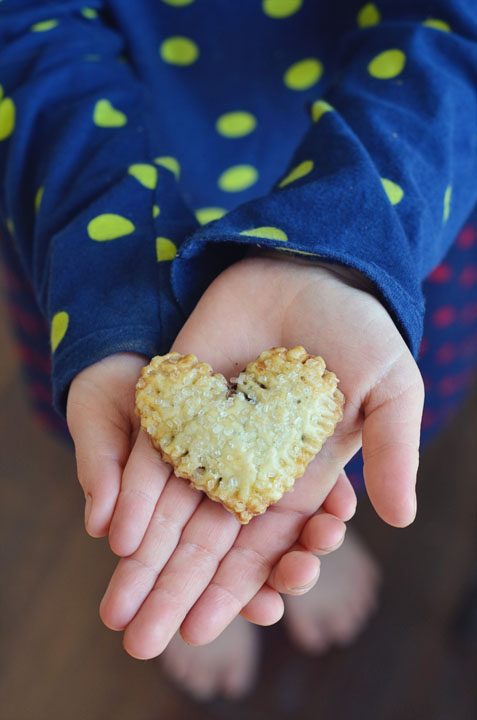
Nutella Heart Pop-tarts
1 recipe for pie crust dough or a prepared pie crust, split in 2
Nutella
1 egg, beaten
crystallized sugar for sprinkling
Heart-shaped cookie cutter
Roll one part of the pie dough out until it’s 1/4 inch thick. Cut the heart shapes out and then place them on a cookie sheet. They need to be far enough away to allow for you to seal the edges with a fork. They won’t rise much so you don’t need to worry about allowing spacing for that. Spread the filling over the hearts , leaving 1/4 space on the edges for sealing. Place an additional heart over the heart with the filling on it. Then, seal the edges all the way around with a fork. Brush the hearts with the beaten egg and sprinkle with sugar. Bake for 10-15 minutes or until brown. The time will depend on the size of the hearts.
Share the love!
If you liked what you see, stick around and find me on:
F a c e b o o k // T w i t t e r // P i n t e r e s t // I n s t a g r a m // E m a i l
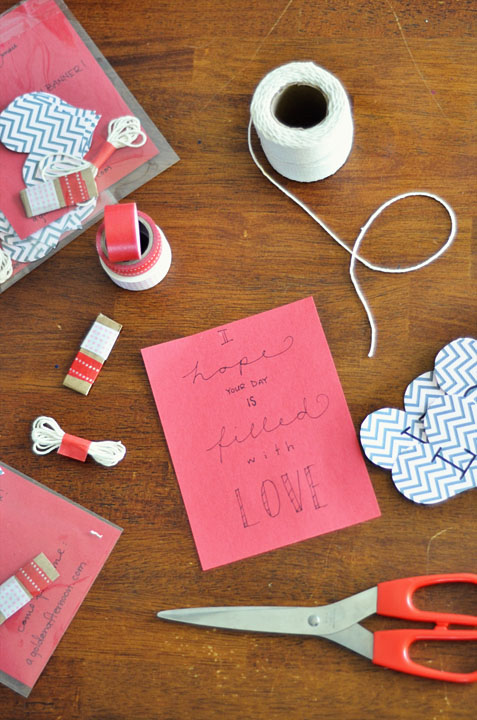
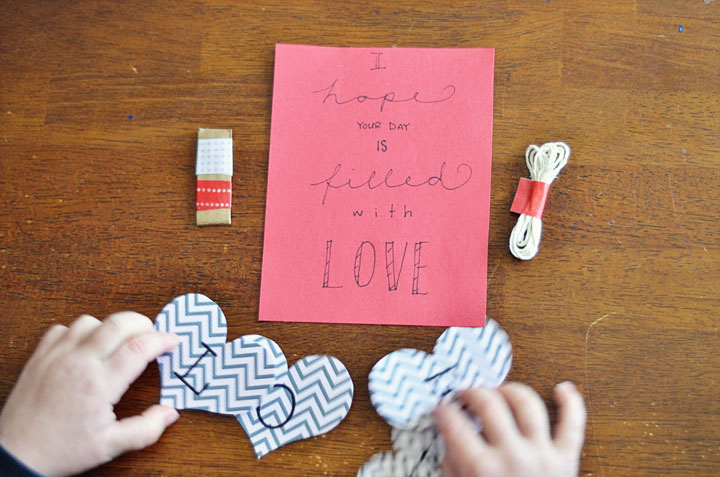
This year, I got to participate in a handmade valentine swap. Super fun, right? It’s nice to know handmade is still alive and well in the world!
For my valentine, I really didn’t have very much time. I know that is said a lot, but things changed for us a few weeks ago. We took our very first older child placement in a few weeks ago. She is 4. It has been a pretty rough few weeks for all 5 of us. This valentine would not have been on my radar had I not already signed up to send them to people before we got placed with this little girl. I didn’t want to leave the ladies hanging who had signed up to swap with me. That’s all to say, most of us probably have things going on right now that keep us from following our hearts desire of making handmade valentines.
So….I created this DIY Valentine’s garland to fill that last-minute-need-to-create void!
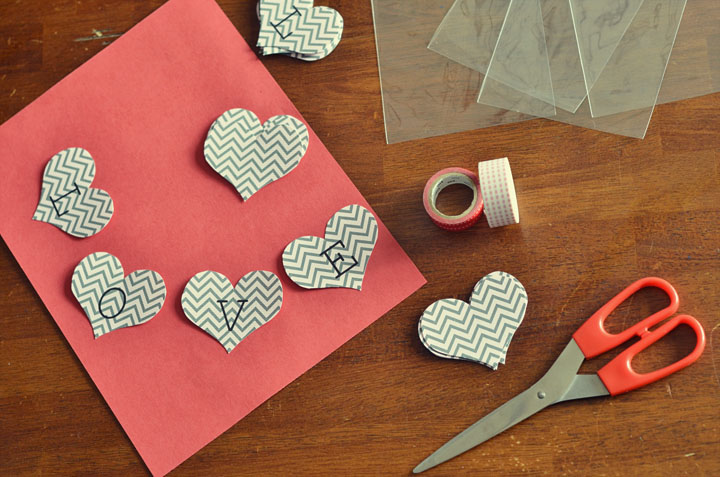
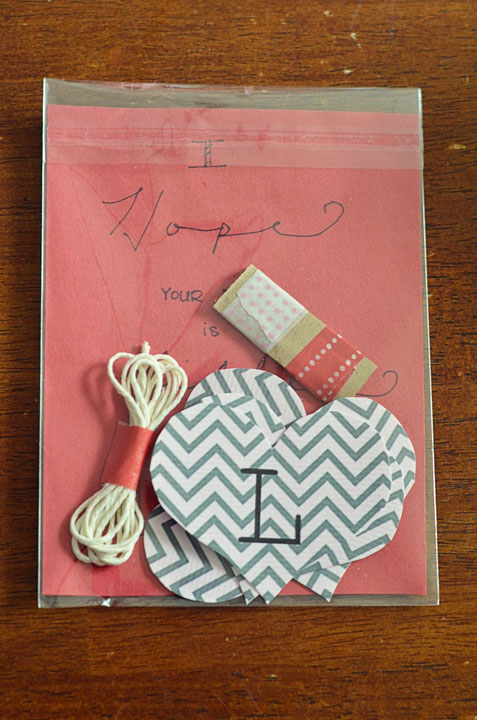
First, print the Valentine’s garland from last year right HERE. Cut out all of the hearts and even some white ones if you desire to make a longer one. I used 4 hearts, but you can include as many hearts as you want as long as you remember to increase the postage.
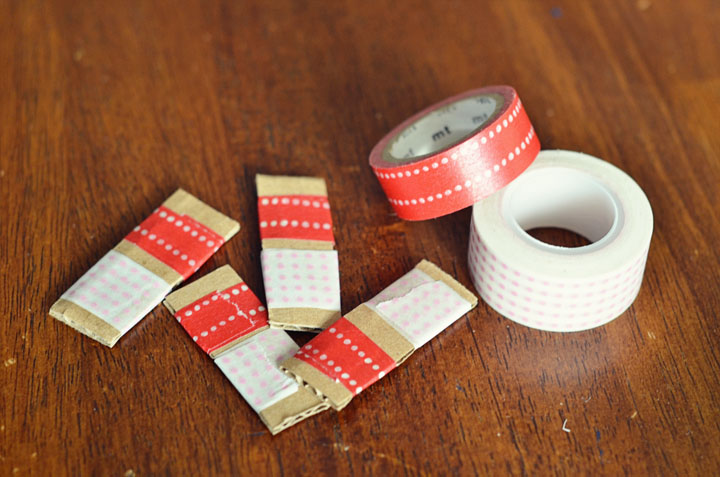
I cut out a few pieces of cardboard, in haste. However, small pieces of wood would be perfect. I wrapped some long pieces of tape around the cardboard so the person could take off whatever they need to hang up the garland and also to adhere the string to the back of the garland. Cut a 1 yard long piece of twine, fold it up, and hold it together with a piece of washi tape. Write a little handmade note and put it in an envelope! A cute little printed paper bag like you can find in my friend Ana’s shop would be perfect, along with some of her heart stickers and mini clothespins!
DONE!
Print, Assemble, and Give!
If you liked what you see, stick around and find me on:
F a c e b o o k // T w i t t e r // P i n t e r e s t // I n s t a g r a m // E m a i l
Page 2 of 7«12345...»Last »
|
|


