
Every Christmas, I make the same cookie recipes. I’m sure I’m not alone in this. I love each one and have no intention of stopping this tradition. However, every year I also am tempting by the intriguing new recipes from Bon Appetit, Martha Stewart Living, my old Gourmet’s, and every other picture at the checkout line. I look and look at my stacks of Christmas magazines but don’t usually make time during Christmas for more than 1 or 2. This year I made one from my list from 2 years ago, which I was reminded of by this Pinterest pin. I’ve had cardamom cookies and marshmallows from a really great bakery in New York called Whimsy and Spice before. They have really great sampler boxes if you are looking for a gift for a foodie…or anyone really. Ever since I tried theirs, I’ve wanted to make some.
So, I give you my version which I added orange zest and hazelnut meal to.
 
Orange and Cardamom Crescents
(adapted from Bon Appetit)
3/4 tsp. cardamom
1/2 teaspoon ground cinnamon
1/2 teaspoon kosher salt
2 1/2 c. flour
1 1/2 cups powdered sugar, divided
3/4 c. hazelnut flour
1 c. unsalted butter, room temp
1 T. vanilla
Preheat oven to 350°. Whisk cardamom, cinnamon, salt, and flour together. In a separate bowl, whisk 1/2 cup powdered sugar and hazelnut flour. With your mixer, beat butter and vanilla until creamy. Add sugar/hazelnut mixture, zest, and beat to blend. Add the dry ingredients and blend until they form a course but moist mixture. Flip onto the counter and knead a few times until it forms a ball.
Take a T. of the dough, form a ball, and roll it a few times in your hands until it makes a log. It will be about 1 1/2 in long. turn up the ends to make a crescent shape. Place the formed cookies on a cookie sheet with parchment paper. Bake for about 12 minutes.
Sift the rest of the powdered sugar (1 c.) onto a plate or something else you could use to roll the cookies in. Roll the warm cookies in the sugar until the are covered and set on a rack to cool.
Post your Christmas Pinterest Pictures here…

Check out day 1 here.
On the first day of Christmas…
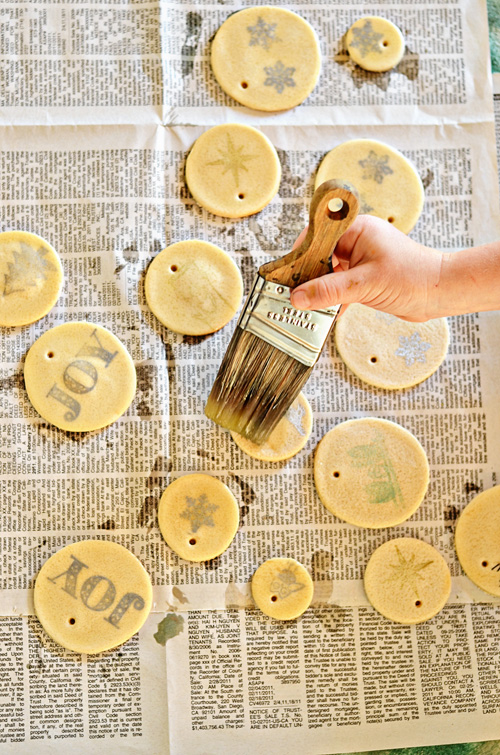
Salt dough. We all know it. We all used it in elementary school or at home (thanks,mom!). For my family, salt dough meant Christmas ornaments in the shape of little bears representing different years with changing interests. My family still makes fun of me for the little bear ornament I took little bites out of every year. A little salt and polyurethane never hurt anyone, right? So, I knew I wanted to make these dough ornaments with my little guys too.
Anyone who knows me knows I’m not really into cheesy little kids projects involving gluing pre-cut foam pieces together or making yet another egg-crate creature (although I’ve seen a few tempting ones of late). I like to try new things and learn new skills, so my kids go along for the ride. They don’t know any different. They know I’m crazy around here already so nobody is in the dark concerning that.
So, back to the salt-dough ornaments. Here is the Pinterest pin I was inspired by. I put my own spin on it by using rubber stamps.

For the dough:
1/2 cup salt
1/2 cup water
1 cup flour
Every craft book I’ve ever known has this 1/2 – 1/2 – 1 ratio. As seen above, we mixed (pre-measure if you need to for kids) and needed under the dough was workable like pizza dough. If you’ve never made pizza dough you should. Basically, it should be elastic and able to be spread apart a bit.

We cut ours in circles just to keep the lines clean in case the kid applied stamps got a little messy.

I think stamping and then cutting would be best next time around since you don’t want to squish the shape.

We’ve collected a few Martha stamps along the way. These plastic stamps that adhere to the mounted block are the cheapest stamps and the best to store. You can get a wide variety without spending $200.

For extra stability and for a cleaner look, we added a coat of polyurethane which is just a smelly clear glaze found at any hardware store or paint store. You could also use Sculpey glaze (made for glazing clay) which is found at craft stores or amazon right here.

After they dried, we added some mommy/daughter signatures and the date. You could also save that side to use as a gift tag. It would be super-cute that way. Hopefully of few of hers will make them on the packages.

The stamps turned out pretty cute with the baker’s twine. They got darker after the glaze went on.

We threw in a monogram or two.

Also, a few random critters. I would have loved a better stamp on this one, but you only get one shot!

We are enjoying our break, decorating, projects, Christmas music, and hangin’ with our buddies.

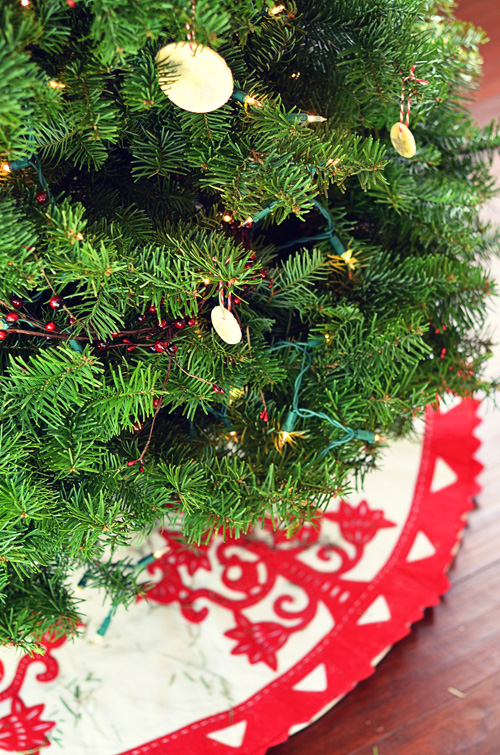
Made a little progress on the tree in the kitchen.
You have no idea how many of my shots he jumps in the middle of. Weirdo.
Don’t forget to add your Pinterest Christmas projects to the “12 Days of Pinterest” flickr page!

Check out the Ella Fitzgerald holiday Pandora station while you’re making these…


If you’re like me, you see things all the time in stores and in magazines that you could totally make. This year, with the handcrafted movement ascending to even greater heights, I’ve seen tons. The decorations are mostly over-priced versions of popular Christmas-time silhouettes. A lot are actually made out of good materials so it’s not like buying something that looks great for 5 minutes and then falls apart. All of the companies, represented above, make a good product. I just don’t care to spend so much money. With me?
1. Felted Ball Wreath found at westelm.com, $39.
This wreath would be easy to make by putting some felted balls together with some glue. The felted balls are made by using 100% wool felt found at craft stores (I suggest online this close to Christmas because mine are completely wiped of Christmas colors). You simply form the ball and shrink them in hot water. It’s like what you may have done with a wool sweater on accident except this time the shrinking is on purpose.
2. Printed Paper Tree from anthropologie.com, $48.
Stack some cool old paper (music, manuals, book pages), grab some jagged-y scissors and cut in differing sizes to form a tree shape, and slide them down a paper towel holder.
3. Live Moss Letters from potterybarn.com, $79
Michael’s sells sheets of moss for a few bucks. You could easily cut out letters from cardboard or buy the “raised” kind from Michaels’ for a few dollars. Just pull out some scissors and glue and go to town.
4. scalloped Trees from westelm.com, $39-$79
Michael’s sells floral styrofoam which is in the shape of a tree or cone. You could line these with pieces of split bamboo or driftwood. You can find either at floral supply stores. My backyard is crawling with bamboo if you ever need some…
5. Bird Seed Garland from redenvelope.com, $29.95
Throw some seeds which feed your local bird life and mix it with a little bit of something sticky, like honey or agave. Press the mixture between cookie cutters or in muffin tins with a string in the middle of the molded shape.
6. Modern Nutcracker from westelm.com, $29-$69
Find a cheap nutcracker that’s dressed as a zookeeper or a dolphin trainer, rip off the extra stuff, and spray paint the thing white or red.
**UPDATE**I made the Nutcracker! Tutorial found here. :)
7. Feather Tree from Anthropologie.com, last year
Use the same florist cones as mentioned above except add feathers, starting from the bottom.
8. Manzanita Candelabra from westelm.com, $99
Yes, this is made out of metal and last time I checked I don’t have welding equipment downstairs. However, you could totally use branches. You can get manzanita (super-sturdy) branches at floral supply stores, If you live near manzanita trees you could grab some dead ones off the ground. Dried would be best I think, considering they will be painted. I’ve been searching for some whilst driving through our local mountains, but I get car sick, you see, and quickly aborted that mission.
I’ve seen tons more since making this list, but it’s a start.
Hope you find something to make :)
I’m getting started with my “12 days of Pinterest”…check it out!

SO, Miss F and I were looking for a quick project one day. I had just bought these wreaths for $3 at Joanns. I knew I wanted to make a banner because banners are awesome. I make a banner every few weeks for all sorts of things. If you’re like me, you have a few things you wanted to complete (Pinterest, anyone?) before thanksgiving. So, go out and do them!

Miss F jumped on board and made hers all by herself. We used some of my old scrap-booking paper. Oh, I never mentioned I was an avid scrap-booking from like the 5th grade until my baby girl was about 1 1/2? Hmmm. It is a crazy hobby and I’m glad I am now recovered. For a while there, I would spend hours on only a few pages. I can’t imagine doing that now. Anyway, that means I still have a ridiculously large modest amount of scrapbook paper to be used.
All I did was put a dot of black ink down for her to cut towards. She cut triangles from the paper folded in half. The triangles were then glued onto the string and left to dry.

Next, we added the embellishments in the form of fabric and fabric flowers.
So, these elusive fabric flowers are super easy to make. I have tried a few tutorials and never find them to work quite the way I want them to. The best way I have found to make them is to take a 2 in. wide strip of scrap fabric. I then fold it in half. I don’t iron mine the way some crazy people do. I suppose if you were running a business, from the flowers turned into jewelry, that would be a great idea. I, however, am running a tight operation which has a a time budget of, oh, 10 minutes for such a project. After you fold them in half, you start rolling the fabric from one end. After a few rolls, secure it with a glue-gun. At this point, I start twisting the fabric around that secure portion. It will start to look like a cinnamon bun. I secure mine with a dot of glue from a glue-gun at each pole (N, S, E, W). I twist it around and glue continually on the poles until I have reached the last 3/4 in. of the fabric. Then, I wrap that piece of fabric towards the back are glue it there.
I wrapped some fabric around one side, hung my banner across, and secured a few fabric flowers in a way that made me smile.
Wreath complete!
So, go out and get one before company arrives. You know you’re crazy like me and go to Joanns for last-minute Thanksgiving projects too, right?
It would make a great hostess gift or a gift for your neighbors.

Yes, I love ocean spray too. In fact, I have always preferred it and have even been known to buy a few extra cans to open when the company leaves. I don’t think any of us can explain it. Who would have ever thought that any food with ridges on it would be appealing? We just like it, right? Our parents served it to us and it became a tradition and comfortable.
Small problem. There is so much corn syrup and high fructose corn syrup jammed into one can now that I can’t even stand it anymore. Last year, I attempted a homemade version that I put in a can to pop out like our favorite. It tasted pretty close, but didn’t “jell” the way I would have liked.
Enter: 2011 version which definitely has that “jell”.

These berries capture the holiday spirit all by themselves.

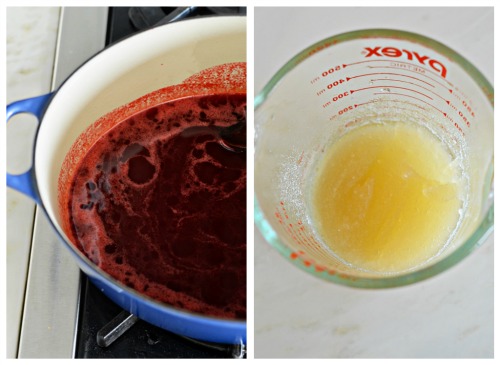
Combine cranberries, sugar, and 3 c. water until the berries start popping. Usually this takes about 20 minutes, but it totally depends on your pan and its heat conduction. After the majority of them are popped, you can strain it in a sieve. I’m not cool yet and don’t own a $100 dollar sieve, but I just strain mine once through a colander and then again through my small sieve. It works. I do hope to join the sieve club soon, though, because it will save me some serious time. You just need to strain it until you have 3 cups of liquid. You might need to use a spatula to move the cranberries back and forth to get them to pass through. While it is straining, combine the 3 Tbsp. water with the gelatin and let it sit for a few minutes. After that, return the liquid to the pan and add the gelatin/water combo. Simmer until the gelatin is dissolved and remove from the heat. Immediately, pour the cranberry sauce into the mold. In my case it was a BPA-free can. That way you don’t have to worry about a weird chemical transfer after all that work. Yes, many cans are actually labeled BPA-free so you should have no problem finding one.

Here they are, ready to throw into the refrigerator for at least 12 hours but at least a day is best.

Can O’ Cranberry Sauce
(adapted from Epicurious)
4 bags (12 oz.) cranberries
2 1/2 cups sugar
3 c. water
3 envelopes of unflavored gelatin + 3 Tbsp. water
If you dare…

Yes, I really did that. What can I say, I love Legos and I love my boys.
You could put this in any mold you want. If I was Martha, I would put it in a cute little turkey mold, but I’m not.
So, I made Lego cranberry sauce.
…
Note: If you wanted to can this, you would just process it for 5 minutes. After you sterilize the jars, add the liquid to the sterilized jars at the same point you put them in the can.
Page 7 of 7« First«...34567
|
|


