Protein Bon Bons

agoldenafternoon-6

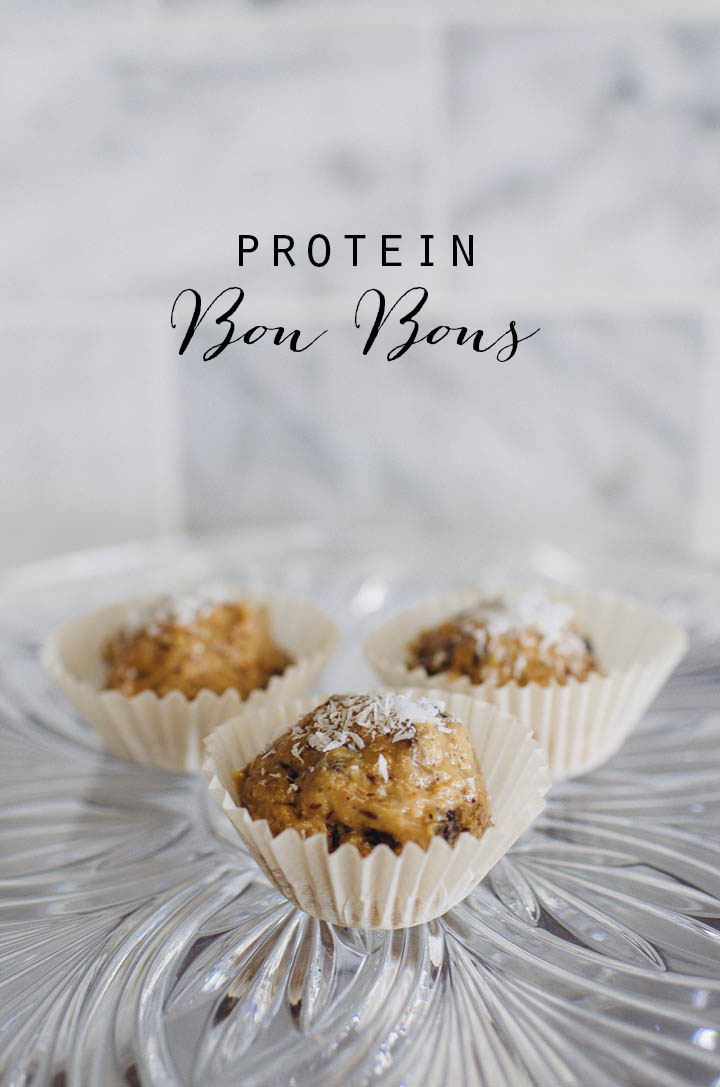
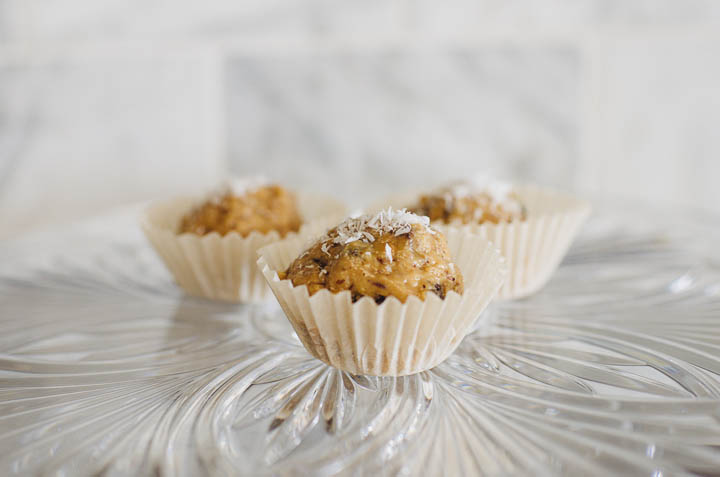
This recipe is definitely my most requested one.  I think the cute “bon bon” with coconut sprinkles draws people in, the deliciousness keeps the love going,  and the bonus health points keep people hooked.

As a parent, we are always trying to find healthy snack for our kids.  I posted on Instagram the other day (here) about the subject. I know we all get lazy sometimes and try not to think about what we are letting our kids munch on.  I mean, we have 3 meals to focus on, right?  Every few months, I reevaluate what I’m feeding the kids during snack-time.  All of those “little meals” can really add up.  But wait…the snack packages they eat from say “organic” and “whole grain”, That’s healthy right?  Even cute little organic cheddar bunnies can be disguised as healthy foods.  If we are really honest with ourselves, our kids need as many real and pronounceable foods in their bodies as possible.  Snack time will never look perfect, but I want to keep trying to improve what I put in their little tummies.  These bon bons are a great way to make protein-rich snacks for your kiddos that have completely recognizable ingredients.

Sidenote: I am not a “professional” on the subject of nutrition but I do have the ability to read information and reason.  It is a terrible rumor about town that the fat in nuts is unhealthy.  This is totally and completely not true.  If your family is consuming a healthy diet of lean meats, veggies, fruit, and grains, there should be no reason that nut fats are bad for you.  For the unhealthy eater, they are still not bad, they will merely add completely unnecessary calories to that particular person’s body. Learn to interpret information yourself so you can make good choices, ya know?

Enjoy making these…we try to throw some together every week!

agoldenafternoon-3

agoldenafternoon-7

Protein Bon Bons

2 16 oz. containers unsalted and unsweetened peanut butter (almond butter for Paleo/Whole 30 :))
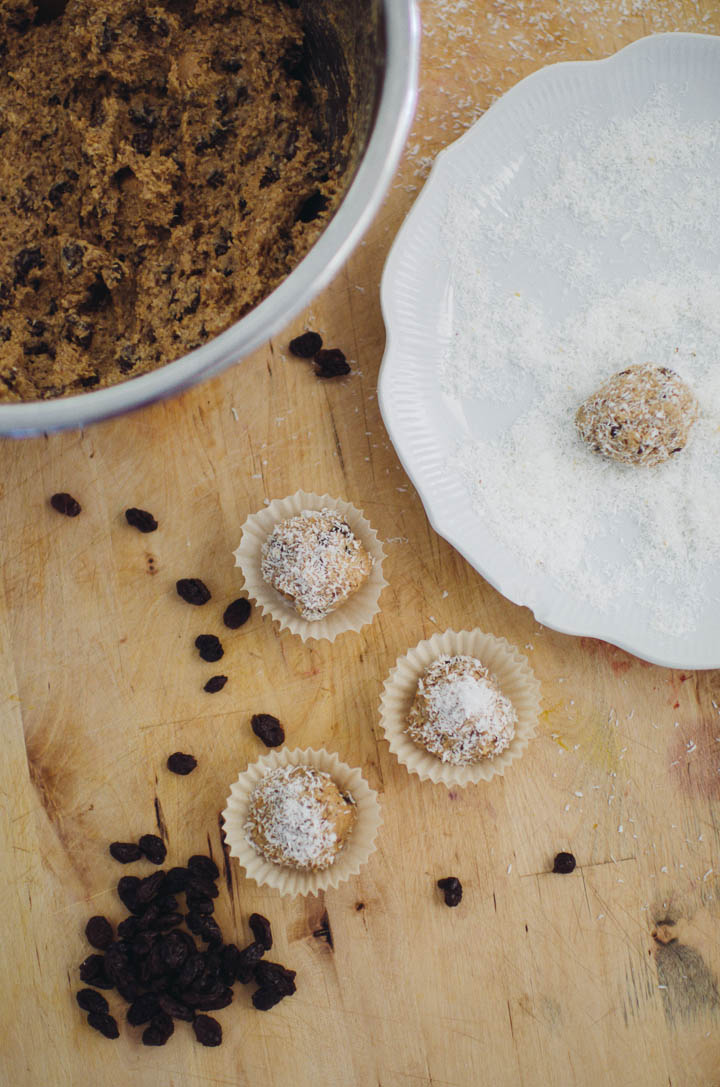
4 cups raisins

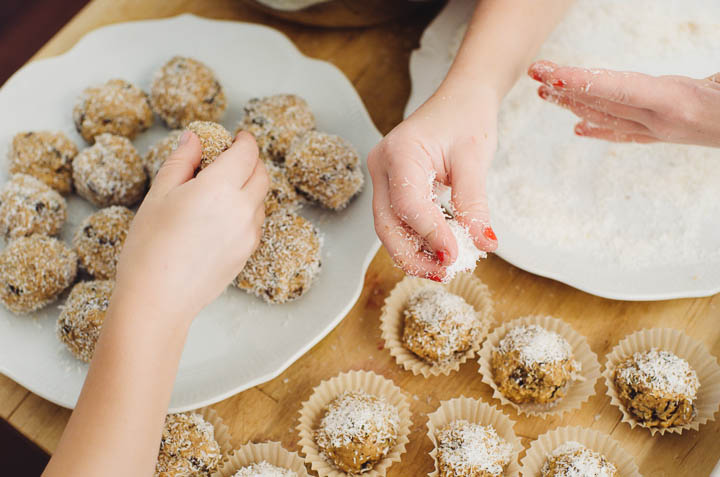
1 1/2 cups unsweetened shredded coconut, plus more for garnish

1 1/2 cups raw honey

1 cup flaxseed meal

1/2 cup almond meal

*optional: cocoa nibs

Mix all of the ingredients together.  Form bon bons into any size.  I love putting mine in mini cupcake liners so that the kids can handle them more easily (read: make less mess).  Sprinkle the bon bons with coconut.  Refrigerate until you are ready to eat them.

Note: This recipe will vary based on the kind of peanut butter you use.  I use the Whole Foods Organic Everyday value smooth unsalted peanut butter.  Some peanut butter are more liquidy like the pre-stirred kind so you can always add more raisins and more coconut or either kind of meal.  If your peanut butter is the no-stir kind, just leave out a bit of the meals or coconut.  You’ll find your own balance and add less or more honey depending on how sweet you like it.  Substituting almond butter for peanut butter means a thicker batter so be sure to add a little less of the dry ingredients!

agoldenafternoon-3

Click below to follow us on:

F a c e b o o k  //  T w i t t e r  //  P i n t e r e s t  //  I n s t a g r a m  //  E m a i l


Sweets: Nutella Heart Poptarts

11

We love Nutella.

We love hearts.

We love pop-tarts.

Now, they have been brought together as one.  It’s a good day.

I’ve made Nutella pop-tarts before here, but the heart really gives it that sweet touch (sweet tasting and also sweet looking…har har).

Nutella Heart Pop-tarts

1  recipe for pie crust dough or a prepared pie crust, split in 2

Nutella

1 egg, beaten

crystallized sugar for sprinkling

Heart-shaped cookie cutter

Roll one part of the pie dough out until it’s 1/4 inch thick.  Cut the heart shapes out and then place them on a cookie sheet.  They need to be far enough away to allow for you to seal the edges with a fork.  They won’t rise much so you don’t need to worry about allowing spacing for that.  Spread the filling over the hearts , leaving 1/4 space on the edges for sealing.  Place an additional heart over the heart with the filling on it.  Then, seal the edges all the way around with a fork.  Brush the hearts with the beaten egg and sprinkle with sugar.  Bake for 10-15 minutes or until brown.  The time will depend on the size of the hearts.

Share the love!

15121314

If you liked what you see, stick around and find me on:

F a c e b o o k  //  T w i t t e r  //  P i n t e r e s t  //  I n s t a g r a m  //  E m a i l

Ginger Peach Hand Pies

I hope your summer has been full of rest and peace, friends!

Fresh summer produce is such an amazing part of summer, don’t you think?  I love going to our local markets and soaking in the glorious smells that the season has to offer.  Although I live in a very farm friendly area, summer brings fresh markets to pretty much every area of the country.  If you haven’t found any local farms yet, check out Local Harvest, which gives a pretty accurate list of neighboring farms.  Buying organic food the day it’s picked is a pretty amazing thing.

That brings us to peaches.

I think it’s safe to say this fruit is the essence of summertime.  Without the heat summer brings, there is no peach.  Next time you feel hot, remember all that yummy fruit that is living it up in those rays.  You see, it makes it just a little more endurable.

I thought a good place for peachy goodness to dwell would be inside a hand pie with flaky crust and some ginger.

Don’t you agree?


Deliciousness!  Ok, let’s make these guys…

To start, chop the peaches, grate the ginger, and squeeze the lemon juice.

Mix all of those with the cinnamon, cardamom, and sugar.  The cardamom isn’t necessary, but I really love it, so I threw it in to make things interesting.

After it’s mixed, let the fruit strain from the juices for several minutes.  If the juices were left in, they could leak out and cause burning or make the dough soggy.

Sprinkle a little flour on your counter and rolling-pin.  You should be starting with 4 total pieces of dough (what would have been the tops and bottoms of whole pies from a recipe).  Roll out your dough to be a 14 inch circle or until it’s 1/4 of an inch thick.

Cut the dough twice diagonally to make 4 triangles. Repeat until dough is used up.  You can roll out the scraps to make more pies if you want.

Fill one triangle with peach filling, leaving space all the way around the edges to press down and close.  Place another triangle on top and use a fork to press down the edges.  If you see cracks, try to smooth them with your finger so the juices cannot escape.  Brush the top with the egg and sprinkle with sugar to your liking.  Bake at 400 degrees for 12-14 minutes or until golden brown.

Ginger Peach Hand Pies

For the filling:

3 just ripe peaches

2 tsp. fresh ginger, grated

2 tsp. freshly squeezed lemon juice

1 tsp cinnamon

1/2 tsp. cardamom

2 T. sugar

For the Crust:

1 pie or tart dough recipe, enough for 2 pies with tops and bottoms

( I have one here available from my homemade pop tarts)

or

Pre-made pie dough from a store like Trader Joes.

(Just remember to defrost it beforehand)

1 egg, beaten

large grain sugar for sprinkling on top

To start, chop the peaches, grate the ginger, and squeeze the lemon juice.  Mix all of those with the cinnamon, cardamom, and sugar.  The cardamom isn’t necessary, but I really love it, so I threw it in to make things interesting.  After it’s mixed, let the fruit strain for several minutes.  If the juices were left in, they could leak out and cause burning or make the dough soggy.  Sprinkle a little flour on the counter and rolling-pin.  You should be starting with 4 total pieces of dough (what would have been the tops and bottoms of whole pies from a recipe).  Roll out your dough to be a 14 inch circle or until it’s 1/4 of an inch thick. Cut the dough twice diagonally to make 4 triangles.  Repeat until dough is used up.  You can roll out the scraps to make more pies if you want.  Fill one triangle with peach filling, leaving space all the way around the edges to press down and close.  Place another triangle on top and use a fork to press down the edges.  If you see cracks, try to smooth them with your finger so the juices cannot escape.  Brush the top with the egg and sprinkle with sugar to your liking.

Enjoy this taste of summer!

Junk Food Remade: Pop-tarts

I’m super excited about this post.  Did you ever make something and it turned out ridiculously better than you expected.  Yup, that’s this one.  These were so good I actually ate some pieces of my little guys, which he for some reason didn’t eat.  I don’t do that normally.   I think the other reason I enjoyed this was because the man of my dreams took our enthusiastic little hiking boys out into nature for a bit.  It was pretty peaceful and Miss F and I really felt like baking.

First turn on some awesome music.  Really…just do it.

Whisk the flour, sugar and salt, and combine those with the butter using a hand blender or a food processor.  You want it combined to the point that you have pea-sized pieces.  I had a 6-year-old doing most of the blending so she got as close as she could, shown above.  Over-mixing will result in less flaky crust so err on the side of less blending.

Mix the  milk and eggs with the flour/butter mixture until just combined.  Then divide the dough in half.  One half will be for the top and one for the bottom of the pop-tart.

Roll the dough out (about 1/8 inch thick) to about the size of a 13×9 pan.  Your goal is to make 9 3″x4″ rectangles. Repeat with the other half of the dough.

Brush the dough with the beaten egg.

I let my sweet girl pick the flavors so she picked cherry preserves and nutella.  Love her.

Other options:

Pumpkin filling from a can or homemade

cinnamon and sugar

goat cheese, lemon zest, and thyme

other jams/preserves like this one

melted chocolate chips

onion jam

cooked meat (ode to the British Isles)

sun-dried tomatoes and feta

You can pretty much put whatever you want as a filling, sweet or savory.  We were making these for dessert, so we chose sweet.  When I make these again, I will throw some onion jam in…for sure.  Just make sure, whatever it is, that you leave a 1/2 inch space along each side to close it off.  You will see in the next photos that I overfilled mine, but I knew I would prefer them on the messy side to eating a mouthful of pastry with no filling.  You get me?  :)

Once filled you can place the cut out tops on.  Press down the sides with a fork and poke with a few holes so they don’t puff up too much.  Bake at 350 for 25 minutes or until slightly browned

Since we were making these for dessert, I made up a little glaze with 1/2 c. powdered sugar and about 1 T. of milk.  Add the milk in gradually, as it doesn’t take a lot to make it thinned.  I tossed in a little vanilla bean paste (1/2 tsp) simply because I’ve been obsessed with it for the last year.  My love hasn’t faded for it yet.  Get it here.  I will change the life of your baking.

Drizzle after the pop-tarts have cooled.

Pop-tarts

(adapted from King Arthur Flour)

Pastry:

2 cups flour
1 T. sugar
1 tsp. salt
1 cup unsalted butter, cut into pats
1 large egg
2 T. milk

1 egg, to brush pastry

Icing:

1/2 c. powdered sugar

1 T. milk

1/2 tsp. vanilla bean paste


There were more licking fingers than I could handle at this point.

Enjoy making these.  I really did.  If the weather is cool and you turn some Ray Lamontagne on, you might enjoy it more.

Roasted Brie with Figs and Honey

We were blessed with many figs this year.  I LOVE the texture of fresh figs.  The very thing that I love most, the seeds, is often what people don’t like about them.  I had already made drunken fig jam last year and some regular fig jam as well, so I wanted to make something where you could have the texture and fresh flavor, but add some richness too.  Enter: melting cheese.

I was thrilled to find these ceramic dishes at Anthro this last spring. They are perfect for displaying picked fruit from the yard.


All you need is some brie, figs, and honey.  I used a goat brie from Trader Joe’s because that’s what I had, but any will do.  I used some honey that we got from the Napa Valley where we visited a few months ago.  I’ve bought it a few times before and it’s some of the best.  Check out “Branches” honey from Katz and Company.  Then, just roast at 400 until it melts into awesomeness.  Drizzle with honey and sit down for a few minutes to enjoy.   San Diego had a few random drops of rain today, so it was nice to enjoy this while watching “Fantasia” (the 1940’s version) with my family.

Page 1 of 212